Using a denoiser on a photo allows you to take photos in less than optimal situations. Which if you've taken photographs for awhile, you know that there are simply things you cannot prepare for and occasionally will have to take pictures in less ideal moments. Well, as with many unfortunate happenings that you may run into with photography, iPiccy Photo Editor can help with that. There are times when using a flash changes the picture in a way you dislike, and you don't have a proper lighting kit to alleviate the problem. In these cases people generally increase the ISO and that in turn generally can make a photo very grainy. In many cases people find this unusable. However, that does not have to be the case, as you can use denoise tools to reduce the "static" and grainy parts of the image to make it more suitable for your needs.
Denoise Is Smart Blur In iPiccy
Smart blurring your photo in the noisy and grainy spots will force those spots to become softer and out of focus. This makes them less distracting, which at the end of the day is what you want when trying to get rid of the noise in your photos. You don't want the grain to be annoying and distracting, if you smart blur those spots, it'll give it a more purposeful feel and in many cases more artistic. This way it will often seem like it was your intention to take this type of photo (even if that isn't always the case, your secret is safe with us).
Smart Blur In 4 Easy Steps
As previously mentioned, it's important you understand that this tool isn't a full on denoiser, and doesn't get rid of grain and noise, rather, it controls it and makes it manageable and allows you to salvage photos. It also allows you to take photos in situations where you normally could not.

Step 1) Upload your photo to iPiccy Photo Editor.
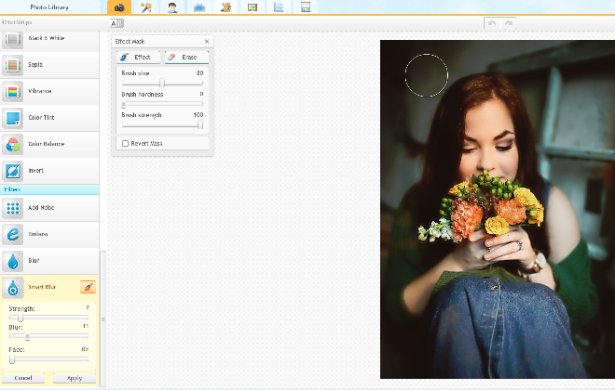
Step 2) Stay in the basic editing tab and scroll all the way to the bottom, and select "Smart Blur"
Step 3) This is more of a recommendation, but Strength - 4, Blur - 2, Fade - 35 is a good place to start when working with this tool. You will need to adjust according to your own personal needs and requirements though.
Step 4) Save your work. You're done!
When To Denoise
Knowing when to denoise a photo is a pretty straightforward and intuitive idea. If your photo looks grainy or noise in it at all, you should denoise it. If you took your photos in less than optimal times, you're probably going to need denoising of some kind. As previously mentioned this will include low light and increased ISO. There are tips and tricks for putting yourself in better situations to take better photos in the first place, but often times you find yourself caught with a need to take a picture for the moment, but have poor lighting. That's when in your head, you'll take the picture but start thinking about to efficiently denoise the photo, or if you can take the photo in such a way that you can do as little denoising as possible. I say as little as possible because while denoise helps, it can't just bring back dead pixels, it can make them more pleasant to look at though.
Smart Blur Denoise Is A Fine Tuned Tool
What do I mean by fine tuned tool? It's a tool that has very specific and and purposeful controls. You can change the strength, fade, and blue levels. This is absolutely necessary as you'll have to adjust and play with these levels to find the appropriate points at which you feel like you're actually pushing your photo edit in the correct direction, and not making it worse. We often talk about how versatile tools can be, but this tool has a very purpose, and as such has very specific controls. It is meant to optimize the best photo edit out of a poor situation. So it is imperative that you have an image in mind when you begin using this tool, as it is very easy to get carried away and end up with a product that you completely dislike. If you work at it with a goal in mind, this tool will be amazing for you, but if you just randomly apply splotches, it will likely end poorly.


